Haxby Catalog of the Canadian 1859 Large Cent
  • Home
  • Articles
  • ID My Coin
    • ID by OBV MARKERS
    • ID by REV MARKERS
    • REV DIE CRACKS TABLE
    • OBV DIE CRACKS TABLE
    • OBV RP LETTERS TABLE
    • REV GROUP SORTING AIDS
  • Haxby Numbers
  • FAQ
  • Links
  • Guestroom
  • NEWS- 11/19/24
[1] Turner I, pg. 135.  We use this system here and in future papers with Rob’s kind permission.
[2] Turner’s represents the second system for cent leaf numbering.  The first was the Watts system, suggested in 1956 and continued by us in Victorian Varieties IV, in which the leaves were numbered clockwise with leaf 1 tucked under the vine loop at 1:00 (see Victorian Varieties VI for references).  In his books Rob Turner has used a different system, where leaf 1 is moved one leaf to the left.  Because the newer system is the only one most modern researchers know, we feel there is little choice but to adopt the newer one.

          Punch breakage would continue throughout most of the die sinking period for the 1859s.  New loci of deterioration were the vine loop at leaf 2 and the petiole to leaf 10.  After each new breakage point was introduced, its ultimate fate would play out independently of the other points.  Some remained stable after the initial breakage event and others deteriorated further.  The deterioration of the Provincial punch as it was being used to sink the 185- dies is shown in Figure 2.  Each “event” is an arrow intersecting a line marked with the cumulative number of dies sunk.  Die number 1 is the first 185- die sunk after the last 8 had been ground off the 1858-dated punch.  Abbreviations used in Fig. 2 and for the remainder of the paper are: Lp = loop, L = leaf and S = stem.
Picture

Figure 1.  The Turner Provincial Cent Leaf Numbering System

Picture
Picture
Picture
              Narrow Gap                            Broken Lp 2       Wide Gap                            Broken S 10
                 In Lp 7                                                            in Lp 7
                                  Figure 2.  The Deterioration Sequence of the Provincial Reverse Punch 


                               The Repair of Punch Defects Introduced Into the Dies

          In the process of completing the dies the defective portions of the device were sometimes repaired.  As the reader will see, some areas were almost uniformly repaired, while others were rarely repaired.

Stem 9
Picture
Picture

Broken, Finely repaired (with one small slip on midvein)


Repaired with two long slips
Picture
Picture

Repaired with

 “kink” 
  (& one slip)


Unrepaired
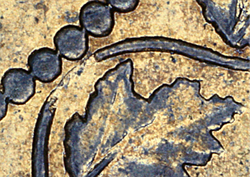
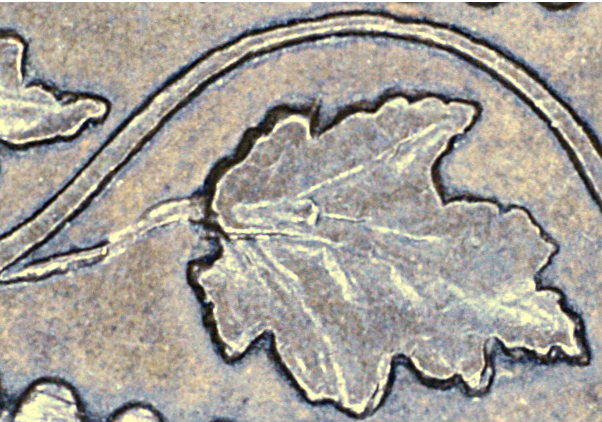
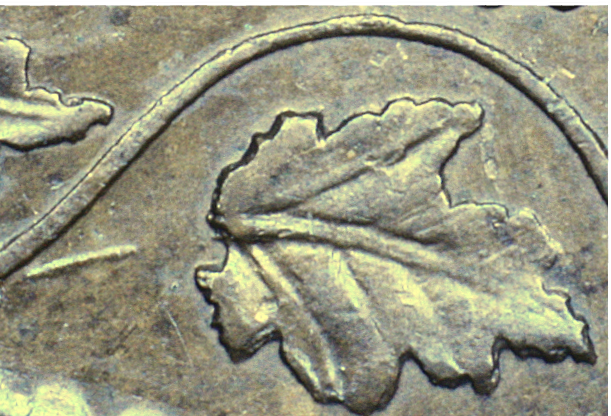
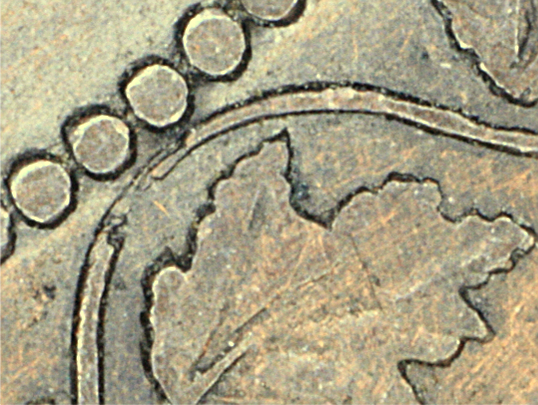
                                                 Figure 3.  Broken and Repaired Stems 9 on 1859 Cent Reverses
         
          The stem to leaf 9 is one of the defective areas already present on the punch when the first 1859 dies were sunk.  It is believed to have broken very early in the production of the 1858 dies, probably after the third die.  The portion that broke off was the second half, toward the edge of the leaf (Fig. 3, panel 1).  Remarkably, for the remainder of the life of the punch S 9 seems to have remained stable.  It is also one of the most consistently-repaired features in the design.  Turner found that the broken S 9 was rarely left unrepaired on the1858 and 1859/8 dies and the same seems to hold for the 1859 N9s.  We have found only one such die so far.

          For the 1858 and 1859/8 dies Turner recognized that the exact shape and thickness of the repaired S 9 (the “new” portion of the petiole closing the gap between the broken end and the leaf edge) is an important diagnostic point in identifying dies.
[1]  That is also true for the 1859 Narrow 9s (see panels 2-4).  However, another related feature that can be equally important is something that can be called “slips”.   These are gouges that can often be seen on the surface of Leaf 9 itself.  During the process of repair, the engraver appears to have made one or more cuts with his burin toward the base of the leaf.  Sometimes the burin continued up onto the leaf, gouging it.  These slips, of which there are up to four or five on some dies, come in various thicknesses and lengths.  The leaf in panel 2 has one fine slip, running along the midvein of the leaf.    On the coin in panel 4 the two slips are so characteristic they alone are sufficient to identify the die that struck the coin.  Although the more delicate slips tend to have worn off heavily-circulated coins, the pattern and number of slips can be powerful diagnostic points when present.

[1] Turner I, pg. 213.

Stems 8 and 10 
Picture
Picture
Picture


Broken 
Stem #8


Original Stem #10


Broken
Stem #10
Picture
Picture


Repaired Stem #8


Repaired
Stem #10
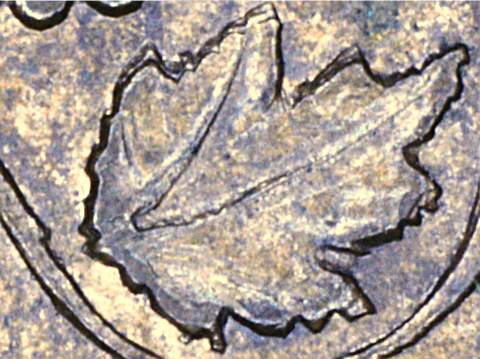
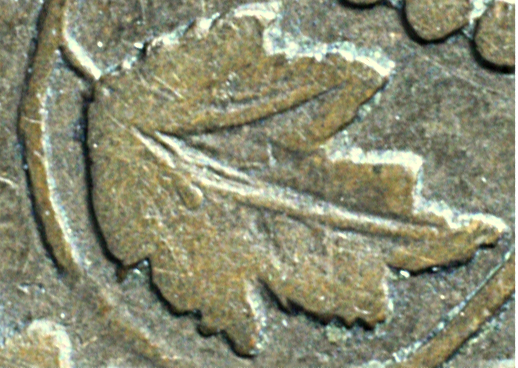
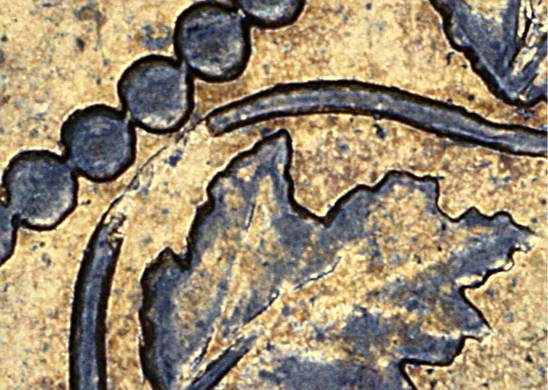
                                          Figure 4.  Breakage and Repair of Stems 8 & 10 on 1859 N9 Cents

          Petiole 8 was another area already broken when the first 1859 N9 dies were sunk (Fig. 4, panel 1).  However, on a few dies it was repaired (panel 2).  That makes the situation for this stem very straightforward: if it is present on an 1859 N9, then it must be a replacement.

          Stem 10 (panel 3) was much more durable; it didn’t break (panel 4) until at least 83% of the 1859 N9 dies had been sunk.  It fact S10 was the last part of the wreath lost from the punch during the Provincial coinage.  But, since S10 also existed in an original, unbroken state on the N9s, one must take care in deciding whether an intact S10 is original or repaired.  There are two things that help in differentiating between original and repaired.  The first is the shape of the stem in its original state (panel 3).  The original shape is triangular, broadening as it approaches the base of the leaf.  Any re-engraving after the stem broke off would be expected to produce a new version of more or less constant width.  Furthermore, the presence of any slips on the leaf itself would be a certain confirmation that the stem had been repaired.  To date we have recorded only a single die on which S10 is repaired with certainty (panel 5).

Vine Loop 2 
Picture
Picture

Original Loop


Well Repaired Loop

Picture
Picture

Broken Loop


Crudely-Repaired Loop

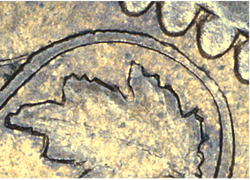
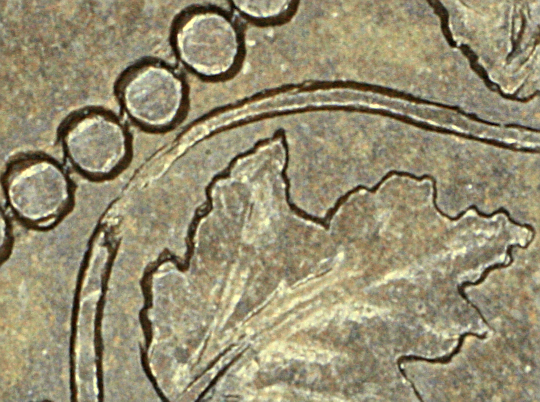
                                            Figure 5.  Loop 2 Breakage and Repair on 1859 Narrow 9 Cents
         
          The first panel in Fig. 5 shows Loop 2 in its original state, before any deterioration occurred.   It broke just short of the 50% mark in the cumulative total of 1859 N9 dies sunk (see Fig. 2), and apparently did so in a single step, as there seem to be no intermediate stages (panel 2).  On some dies Lp 2 was left unrepaired, but on most the gap was closed again, or nearly so.  The skill with which the closure was accomplished was highly variable.  The closure in panel 3 was reasonably neat, but that in panel 4 was obviously much less so (and thereby provides another unique die marker). 


Vine Loop 7 
Picture
Picture
Picture

Narrow Gap


Medium Gap 
Early


Gap Repaired

Picture
Picture

Wide Gap


Medium Gap 
Late
                                        Figure 6.  Loop 7 Deterioration and Repair on 1859 N9 Cents

          The first 1859 Narrow 9 dies made had a gap in Loop 7 already, inherited in the narrow configuration (Fig. 6, panel 1) as it existed on the reverse punch following the removal of the last 8 in the date.   The gap is about the width of one of the adjacent beads.  For some time (about 135 dies), Lp 7 remained stable.  Then it began breaking again.  Frustratingly, it did so in a series of small steps, with pieces breaking off the right-hand side of the broken vine loop.  At the end of the process, which consumed no more than about 20 dies, the gap stabilized in a conformation called wide (panel 4).  At this point the width of the gap is about 2 beads (in the circle above) and its right-hand end lines up with a gap between two beads. 

          Coins displaying Lp 7 with the incremental breaks in between the narrow and wide states, can be said to have a medium gap.  Unlike the narrow and wide gaps, then, the medium gap is not a single conformation, but several; the illustrated example (panel 2) is a middle stage.  Earlier stages look more like the narrow gap and later stages look more like the wide gap.  This will all be discussed and illustrated at the appropriate time when the dies with the medium gap are described in detail.  

                                                          Grouping the Reverse Dies

          Early in our work on the 1859s we concluded that, following an initial sort into 1858, 1859/8 and 1859 Narrow 9, the most useful method for sorting the dies had to take into account the device deterioration.  

          Much later Rob Turner, unaware of Koper’s work (or ours), chose the deterioration of the Lp 7 and Lp 13 as a tool to sort his 1858 dies into three groups: RA, RB and RC.
[1] The overdates make up a single group, RD. [2] A key difference between Turner’s grouping method and the one we use for the 1859 Narrow 9s is that we incorporate the aspect of device repair (or lack thereof) at the die stage.  Indeed, if our method of group assignment were applied to the 1858 and overdate dies, the total number of groups would jump from four to twelve for those two dates. [3]  However, we begin the reverse group designations for the 1859 Narrow 9s with E. [4]  This is to reduce confusion that might result by giving the first N9 group a letter far above where Rob’s groups left off.

          Looking at device deterioration and repair, then, one can separate the 1859 N9 dies into some twelve groups.  The groups and their characteristics are shown in two ways below: as a table (Table 1) and as a flow chart (Figure 7).  In the flow chart the groups that have the heavy box around the name are the “big three”, the groups that contain 15% or more of the total dies and collectively amount to about 80% of the dies.  The conventions Lp and P in the group table and figure have already been introduced.  Additional abbreviations are: for Lp 7, N = narrow gap, M = medium gap, W = wide gap.  For all other loops and petioles, + = unbroken original, -- = missing and (+) = added back by repair.

          The order of the groups approximates the order in which the dies were sunk.  There is some uncertainty about the correct placement of some of the small groups, but the larger groups are certainly in the correct order.  As can be seen from Table 1, the first group, Group E, is huge, amounting to nearly half of the dies. 

          Attribution of the groups containing the medium gap in Lp 7 is a challenge requiring careful removal of dirt in that area.  Remember, any unrepaired gap with more of the right side missing than the narrow gap and less missing than the wide gap satisfies the definition of medium gap.  Fortunately, the medium gap dies constitute only about 8% of the total, so they are not encountered frequently.

[1] Turner I, pg. 136.
[2] Turner II, pg. 40.
[3] That having been said, it is not our intention to publish a die nomenclature system for the 1858s in competition to Rob’s.  His works fine and there is no reason to change it.
[4] We do not use an R (for reverse) in our reverse group designations because there seems no need for it.
Picture

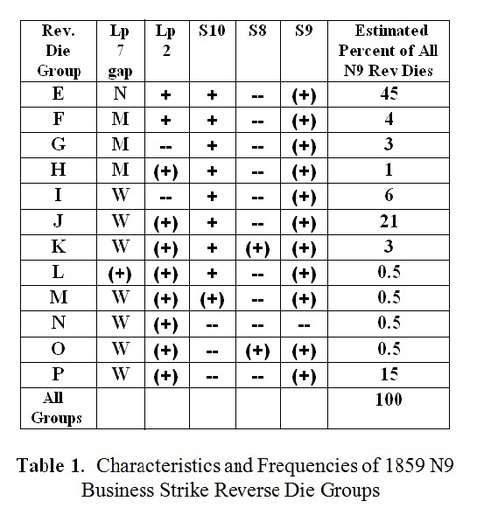
                             Nomenclature for Individual Dies and Die Pairs


          The numbering for the reverse dies is based on the device groups presented in Table 1 and Figure 7.  Die numbers begin with the capital group letter followed by a number.  If a die is part of a reverse die set (two or more reverses linked to a common obverse), then each reverse in the group has the same numerical portion.  The first die in the series has no lower case suffix, but each subsequent reverse has a lower case letter suffix.  For example, in the E7 die set we have observed three reverses: E7, E7a and E7b, E7 being the first and E7b being the last used. 

          Assignment of the die usage sequence in the above die set was made possible by staging the obverse die; that is, noting deteriorative changes that occurred as a result of its continued use.  Such changes could include clash marks, the appearance and progression of cracks and collapses, buckling of the field, wear striations and general blurring of the devices.  Some hardy dies have up to ten recognizable stages (or states)!  If one chooses to express the state of a die as part of the die name, the die state becomes a numerical suffix.  Thus, E7b-6 is die E7b in state 6.  The higher the state number, the more deteriorated the die is.

          Since the Queen’s portrait on the obverse punch did not undergo deterioration like the maple wreath did, the numbering system for the obverses must have a different basis.  For the three bridge obverses that share 1859/8 and 1859 Narrow 9 reverses Turner’s designations die designations are maintained: OI1, OG3 and OG4. [1]

          Serious thought was given to grouping the obverse dies based on repunching patterns in the legend, but at length we decided to make the obverses a single group “o” (for obverse).  Following the “o” prefix is a number and sometimes a lower case letter.  The lower case letter is used analogously to its use on the reverses.   The only difference is that its use is determined by obverse die sets (where a single reverse die shares two or more obverses).  Thus, we find that reverse E5 is coupled first with obverse o2, then with a second obverse, which by convention is designated o2a.

          This brings us at last to the nomenclature convention for obverse-reverse die pairs.  It has the obverse and reverse die names separated by a “/”, e.g., o4/E7a.

[1] Turner II, pp. 82-85, 88-89.  With Rob’s permission.
Picture
                                 Figure 7.  Sorting Scheme for the Reverse Groups of the 1859 N9 Cent

                 Other Features Which Aid in Attributing the 1859 Narrow 9 Dies

          Having completed a survey of the device deterioration and its repair on the 1859 N9s, we can now turn our attention to several other features that result from changes in the dies and which can be useful in identifying specific dies.

Repunched Letters and Numerals 
Picture
Picture

Broken letter, Not repunched


Repunched (less of original letter showing)


Picture
Picture

Repunched (much of original letter showing) 


Repunched (Little of original
letter showing)


            Broken letter,                         Repunched                             Repunched                          Repunched
           Not repunched                    (much of original                       (less of original                   (Little of original
                                                       letter showing)                         letter showing)                    letter showing)
                                        Figure 8.  Repunching of the A of REGINA on 1859 N9 Obverse Dies
Picture
G of GRATIA
Picture
I of REGINA
Picture
R of REGINA
Picture
DE of DEI
Figure 9.  Other Repunched Letters on 1859 Narrow 9 Obverses
Picture
N of CENTS
Picture
T of CENTS
Picture
Double Punched  N9 #2
                                        Figure 10.  Repunched Characters on 1859 Narrow 9 Reverses

            Potentially any letter or numeral on the 1859 N9 obverse or reverse dies can come with signs of repunching.  The panels in Fig. 8 form a particularly interesting series of examples.  In the first panel is something very seldom seen in this series: a defective character that should have been repunched, but wasn’t.  The “broken A” occurs on at least six dies.  When it was repaired, there sometimes remained telltale signs of the original broken A.  In panel 2 these signs are very obvious and in panel 3 they are less so.  On the die that struck the coin in panel 4 the A was repunched so skillfully that one can hardly see any sign that it was done.

            In general the extent to which the repunching of a character is detectable depends on three factors: the number of separate impressions made with the correcting punch, the position of the correcting punch relative to the broken character, and the final depth of the correcting punch impressions.  If the correcting punch wasn’t hit hard enough (as was the case in Fig. 8, panel 2), then even perfect punch positioning wouldn’t prevent some evidence of the broken character from remaining.

            Although repunching details can be very useful tools for die identification, one must use great care.  For example, the two repunched Gs in panels 1 and 2 in Figure 9 look alike at first glance, but they are really slightly different and are not from the same die.

            The reader will find with experience that some repunches occur on many dies (e.g. doubling on the right side of the A in GRATIA) and should essentially be ignored.  These cases will be pointed out later in the detailed descriptions of the dies.

Die Cracks 
Picture
Picture
Picture
                      State 2                                                  State 4                                                  State 5
                                     Figure 11.  Progression of Die Cracks on a Provincial Cent Obverse Die

          Die cracks are an extremely useful tool for quickly zeroing in on the attribution of many 1859 N9 dies, both obverse and reverse.  Some dies seem to have been cracked the moment the first coin was struck.  More often, cracks develop during use.  In any case, once present, cracks tended to continue to extend until the die was retired.  A good example of crack appearance and extension can be seen on the R of REGINA on the die illustrated in Fig. 11.  In State 1 there is no sign of any cracking.  In State 2 a crack runs from a rim denticle to the top of the R, then splits into two small branches to the sides.  In State 7, the final stage recorded for this die, all three parts of the crack have enlarged grotesquely and the field as well shows many irregularities.  

Die Collapses
Picture
                              Figure 12.  1859 N9 Cent Showing a Large Area of Die Collapse at the Left

          Die collapses are a phenomenon primarily restricted to the Province of Canada cent and largely, though not exclusively, restricted to the reverse.  A die collapse is manifested on the coins as a raised area, covering up to 20% or more of the surface.  With a well-developed collapse, like that on the coin in Figure 12, wear in the highest areas can be accentuated greatly.  There can also be multiple collapses on the same die.  We have seen as many as three collapses on a single reverse.

          One assumes collapses are due to inadequate mixing of the die steel.  Whether they are due to air pockets or compression of pockets of contaminants is unclear.  In any case, collapses are another useful tool at our disposal for identifying dies.

Clash Marks, Rust Marks and Overpolished Areas 
Picture
                                                       Figure 13.  Clash Marks on 1859 N9 Cents

            The process by which clash marks arise has long been known to collectors: when the dies come together in the absence of a blank, the opposing surfaces can mark each other.  Die clashes are very common of Province of Canada cents.  One can take advantage of clash marks in die identification, particularly when they are as spectacular as the examples in Figure 13.  In the top panel we see an obverse with multiple, heavy clash marks outlining the vine loops and leaves from the reverse.  And in the lower panel the tops of I and A from the REGINA in the obverse die show clearly flanking L 11 (arrows).

Die Chips
Picture
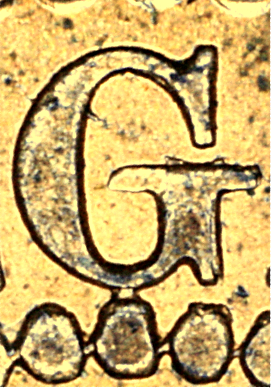
                                             Figure 14.  Die Chip Forming a Bridge on an 1859 N9 Cent

            [This is a new section that must have text written for it.]

Die Clogs 
Picture
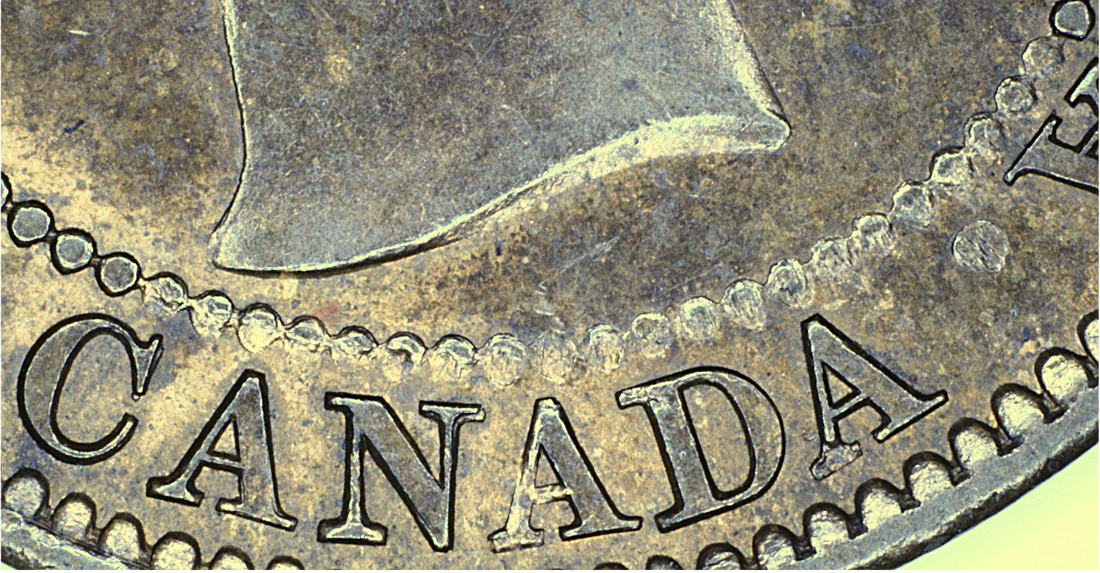
                                                  Figure 15.  Clogged As on an 1859 N9 Obverse

          The final feature in this overview is different from the others in that it is not permanent.  Die clogs result from material getting into the letters or beads and preventing those parts of the design from fully striking up.  Interestingly, some dies have a clog, are cleared and then get a second, different, clog.  For difficult dies, clogs can sometimes be helpful in identification.

Powered by Create your own unique website with customizable templates.